DIY Home Renovation: 4 Weekend Projects That Add 10% Value to Your Property This Year
Discover how to significantly increase your property's value with four achievable DIY home renovation projects. Learn practical, budget-friendly upgrades that pay off in enhanced appeal and resale potential, all within a weekend.
By: Matheus Neiva on June 22, 2026
Are you looking to significantly enhance your property’s value without breaking the bank or committing to months of messy construction? The answer lies in strategic DIY Home Renovation. Many homeowners dream of increasing their home’s appeal and market worth, but often feel overwhelmed by the perceived cost and complexity of renovations. What if we told you that with just a few weekends, some smart planning, and a bit of elbow grease, you could add a remarkable 10% to your property’s value this year?
It’s not just a pipe dream. Carefully chosen DIY projects can offer an incredible return on investment, making your home more attractive to potential buyers and more enjoyable for you in the meantime. In this comprehensive guide, we’ll dive into four high-impact DIY Home Renovation projects that are not only achievable over a weekend or two but also proven to boost your home’s value. We’ll provide you with detailed steps, essential tips, and insights into why these specific upgrades are so effective.
Before we jump into the projects, let’s understand why focusing on DIY renovations is such a powerful strategy. Professional renovations can be expensive, with labor costs often comprising a significant portion of the total bill. By taking on these projects yourself, you save on labor, allowing your budget to stretch further for quality materials. Furthermore, the satisfaction of transforming your living space with your own hands is an invaluable bonus.
The key to successful DIY value-adding projects is choosing ones that offer a high return on investment (ROI) and are manageable for someone with moderate DIY skills. We’ve handpicked four such projects that address common areas where buyers look for value and where a little effort can go a long way. Let’s get started on turning your home into a more valuable asset!
The Power of DIY: Why Weekend Projects Pay Off
The concept of DIY Home Renovation has gained immense popularity, and for good reason. In an age where resources are readily available online, from instructional videos to detailed guides, homeowners are more empowered than ever to tackle projects themselves. But beyond the satisfaction of a job well done, there are tangible financial benefits to embracing DIY, especially when it comes to increasing property value.
Cost Savings and Material Quality
One of the most obvious advantages of DIY is the significant cost savings on labor. Professional contractors charge for their time and expertise, which is entirely justified, but if you have the time and are willing to learn, you can reallocate that portion of your budget to higher-quality materials. For instance, instead of paying a painter hundreds or thousands of dollars, you can invest that money in premium, low-VOC paint that offers better coverage and durability, further enhancing your home’s appeal and longevity. This directly contributes to the overall perceived value of your home.
Increased Personalization and Pride of Ownership
Beyond the financial benefits, completing a DIY Home Renovation project instills a great sense of pride and ownership. You’re not just living in a house; you’re living in a space you’ve actively shaped and improved. This personal investment often translates into better maintenance and care for your home, which in itself preserves and enhances its value over time. Moreover, tailoring your home to your specific tastes and needs, even with small projects, makes it a more comfortable and functional place to live.
Market Appeal and Faster Sales
When it comes time to sell, homes that are well-maintained and feature modern, updated finishes tend to stand out in the market. Buyers are often willing to pay a premium for a “move-in ready” home that doesn’t require immediate work. Even seemingly minor updates from a DIY Home Renovation can create a strong positive impression, making your property more attractive and potentially leading to a faster sale at a better price. The psychological impact of a fresh, updated space on a prospective buyer cannot be overstated.
Learning New Skills and Empowerment
Every DIY project is an opportunity to learn new skills, whether it’s how to properly use a drill, apply caulk, or install a light fixture. This newfound knowledge builds confidence and empowers you to tackle even more ambitious projects in the future. It’s a continuous cycle of improvement, both for your home and for your personal capabilities. This empowerment is a significant, often overlooked, benefit of engaging in DIY Home Renovation.
Now that we’ve established the compelling reasons to embark on these projects, let’s explore the four specific DIY Home Renovation ideas that promise a substantial return on your time and investment.
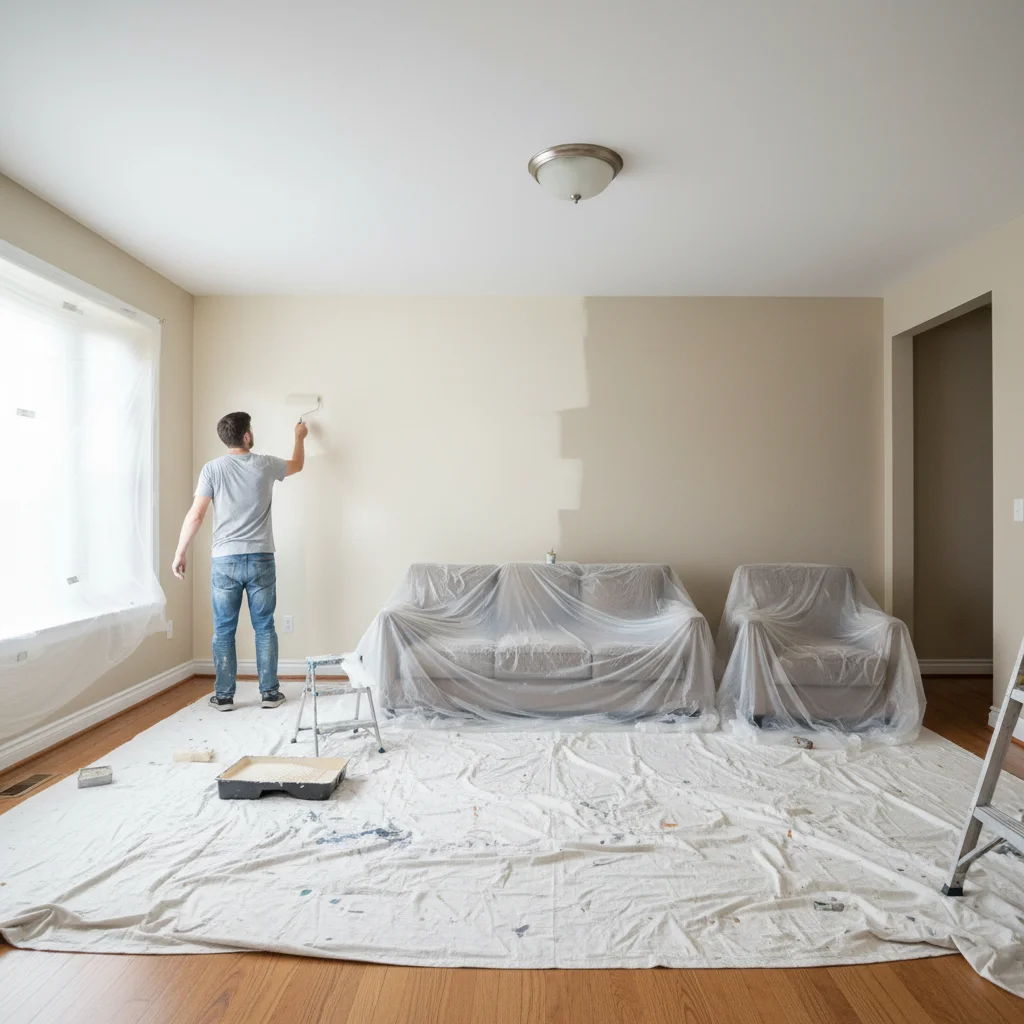
Project 1: The Transformative Power of Paint & Trim
It’s often said that a fresh coat of paint is one of the cheapest and most effective ways to transform a space. This holds true for boosting home value. A well-executed paint job, coupled with refreshed trim, can make an old room feel new, clean, and modern. This DIY Home Renovation project is a cornerstone for any homeowner looking to make a significant impact with minimal outlay.
Why it Adds Value
First impressions matter. When prospective buyers walk into a home with freshly painted walls, it immediately conveys a sense of cleanliness and care. Neutral colors, in particular, appeal to a wider audience, allowing buyers to envision their own furniture and décor in the space without being distracted by bold or outdated hues. Moreover, crisp, clean trim throughout a home signals attention to detail and a well-maintained property. This project directly addresses aesthetic appeal, which is a major driver of perceived value.
What You’ll Need
High-quality interior paint (consider low-VOC options for better air quality)
Primer (if changing dark colors or painting over stains)
Paint rollers, roller covers, and brushes (angled brushes are great for trim and corners)
Painter’s tape (blue tape is often preferred as it’s less likely to damage surfaces)
Drop cloths or old sheets
Screwdriver (for removing outlet covers)
Spackle or wood filler, and a putty knife
Sanding block or fine-grit sandpaper
Caulk gun and paintable caulk (for sealing gaps in trim)
A ladder or step stool
Cleaning supplies (sugar soap or mild detergent)
Weekend Steps for Success
Preparation is Key (Friday Evening): This is the most crucial step. Clear the room of furniture or move it to the center and cover it. Remove all décor, curtains, and switch/outlet covers. Clean walls thoroughly with sugar soap or a mild detergent to remove grime and dust. Fill any nail holes or cracks with spackle, let it dry, and sand smooth. Apply painter’s tape along baseboards, doorframes, window frames, and ceiling lines. Don’t rush this – precise taping makes for sharp lines.
Prime and Paint Walls (Saturday): If necessary, apply a coat of primer. Once dry, start painting your walls. Begin by “cutting in” with a brush around the edges where the wall meets the ceiling, trim, and corners. Then, use a roller for the main wall surfaces, working in W or M patterns to ensure even coverage. Apply a second coat if needed after the first has dried completely (check paint can for drying times).
Tackle the Trim (Sunday Morning): Once the wall paint is dry to the touch, carefully remove the painter’s tape from the walls. Now, focus on the trim. If your trim is in good condition, a good cleaning and a fresh coat of semi-gloss or high-gloss white paint will do wonders. If there are gaps between the trim and wall, apply a thin bead of paintable caulk and smooth it with a wet finger. Paint the trim with a brush, taking care to achieve a smooth, even finish.
Final Touches (Sunday Afternoon): As soon as the trim paint is dry to the touch, carefully remove any remaining painter’s tape. Reinstall switch and outlet covers. Move furniture back into place and rehang décor. Stand back and admire your transformed space!
Pro Tip: For a truly high-end look, consider replacing old, dated baseboards with taller, more modern ones. This is a slightly more involved DIY Home Renovation but can significantly elevate a room’s aesthetic.
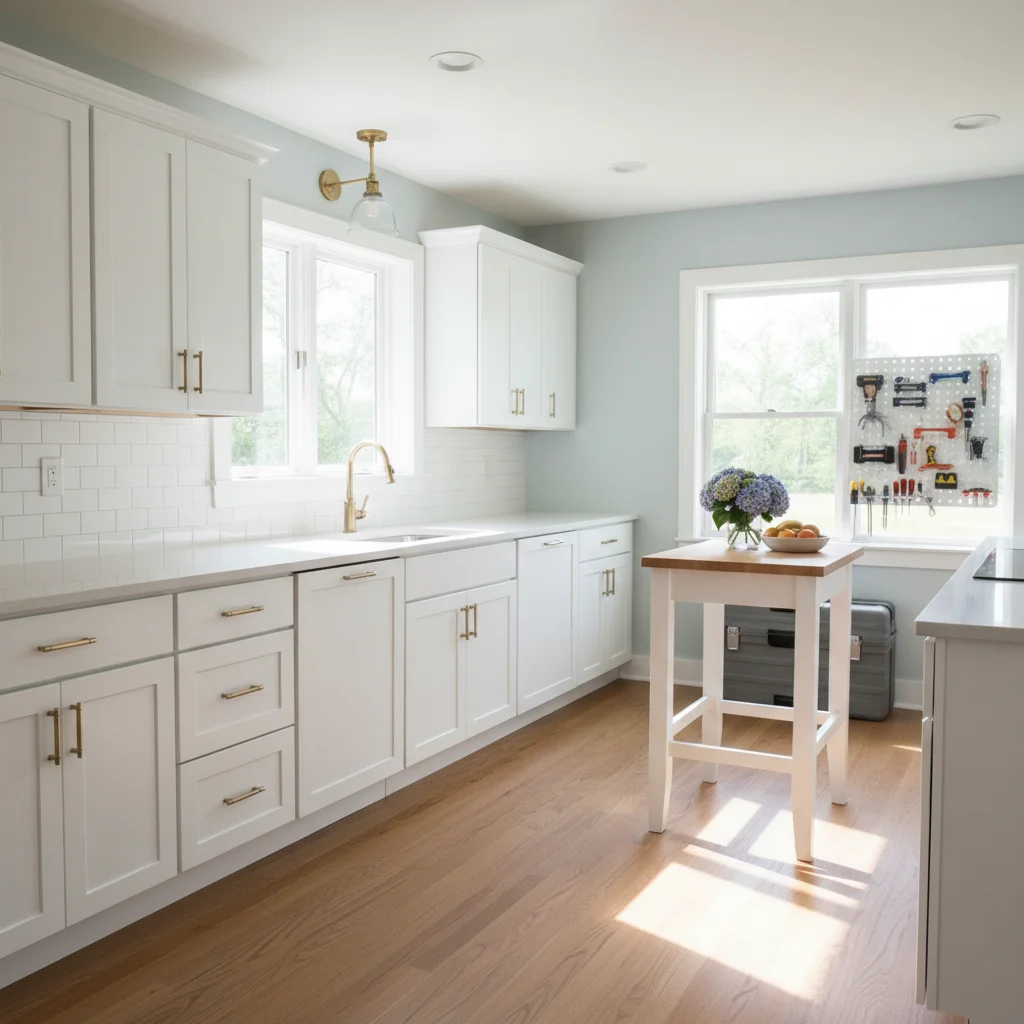
Project 2: Revitalizing Your Kitchen Cabinets
The kitchen is often called the heart of the home, and it’s also one of the most important rooms for resale value. A full kitchen renovation can be incredibly expensive and disruptive, but a targeted DIY Home Renovation of your cabinets can achieve a similar visual impact for a fraction of the cost. This project focuses on refreshing existing cabinets rather than replacing them entirely.
Why it Adds Value
Outdated or worn cabinets can make an entire kitchen feel old and uninviting. By painting or refinishing your cabinets and updating hardware, you can dramatically modernize the space. This instantly elevates the kitchen’s appeal, making it feel brighter, cleaner, and more contemporary – all highly desirable qualities for potential buyers. A fresh kitchen is a huge selling point.
What You’ll Need
Screwdriver (manual or power drill)
Degreaser and cleaning rags
Fine-grit sandpaper or sanding block (120-220 grit)
Tack cloth
Wood filler (for any imperfections)
Painter’s tape
Primer (specifically designed for cabinets)
High-quality cabinet paint (cabinet-specific enamel or lacquer is best for durability)
Paintbrushes (high-quality angled brush) and small foam rollers
New cabinet hardware (pulls, knobs)
Drop cloths or cardboard
Safety gear (gloves, mask)
Weekend Steps for Success
Disassembly & Cleaning (Friday Evening): Remove all cabinet doors and drawer fronts. Label them to remember their original positions. Remove all hardware (hinges, pulls, knobs). Thoroughly clean all cabinet surfaces (doors, drawer fronts, and cabinet boxes) with a degreaser. Kitchen cabinets accumulate grease and grime, and proper cleaning is essential for paint adhesion.
Sanding & Priming (Saturday Morning): Lightly sand all surfaces to be painted. This creates a “tooth” for the paint to adhere to. Wipe everything down with a tack cloth to remove all dust. Apply a thin, even coat of cabinet-specific primer to all surfaces. Allow to dry completely according to manufacturer instructions.
Painting (Saturday Afternoon & Sunday Morning): Apply your first thin coat of cabinet paint. Use a high-quality brush for edges and details, and a foam roller for smooth, even coverage on flat surfaces. Avoid applying paint too thickly, as this can lead to drips and an uneven finish. Allow the first coat to dry completely. Lightly sand again with very fine-grit sandpaper (220+) if needed, then wipe with a tack cloth before applying a second coat. Most cabinets will require 2-3 thin coats for a durable, professional finish.
Hardware & Reassembly (Sunday Afternoon): Once the final coat of paint is completely dry and cured (this might take longer than just “dry to touch” – check paint instructions), install your new hardware. Reattach hinges to the doors and then rehang the doors onto the cabinet boxes. Reinstall drawer fronts. Take your time with adjustments to ensure everything aligns perfectly.
Pro Tip: If your cabinets are structurally sound but aesthetically dated, consider adding crown molding to the tops of upper cabinets for a custom, built-in look. This is a relatively easy addition that significantly upgrades the visual appeal of your kitchen as part of your DIY Home Renovation.
Project 3: Bathroom Refresh – Caulk, Grout, and Fixtures
Like the kitchen, bathrooms are critical areas for home value. While a full bathroom remodel is a major undertaking, several high-impact DIY Home Renovation projects can be completed over a weekend to make your bathroom feel significantly cleaner, newer, and more luxurious. This focuses on the details that often detract from a bathroom’s appeal.
Why it Adds Value
Dingy grout, mildewed caulk, and outdated fixtures can make a bathroom feel old and unhygienic. By addressing these issues, you instantly elevate the perception of cleanliness and modernity. Buyers appreciate a bathroom that looks fresh and well-maintained, as it suggests less immediate work for them. These small changes collectively create a powerful aesthetic upgrade.
What You’ll Need
Grout cleaner and brush
Grout sealer
Grout saw or removal tool (if re-grouting)
New caulk (silicone caulk for wet areas) and caulk gun
Caulk removal tool
Utility knife
New showerhead, faucet, and/or toilet handle
Adjustable wrench, plumber’s tape
Cleaning supplies
Safety glasses and gloves
Weekend Steps for Success
Grout & Caulk Cleanup (Friday Evening): Start by thoroughly cleaning all grout lines with a dedicated grout cleaner and brush. For heavily stained or mildewed grout, you might need a stronger solution or even a bleach-based cleaner (always test in an inconspicuous spot first and ensure proper ventilation). If caulk is mildewed, cracked, or peeling, use a caulk removal tool and utility knife to carefully remove all old caulk from around the tub, shower, and sink. This step is crucial for a professional finish.
Re-caulk & Re-grout (Saturday): If you removed old caulk, apply a fresh bead of high-quality silicone caulk. Smooth it immediately with a wet finger or a caulk tool for a clean line. If your grout is beyond cleaning, you might need to re-grout, which involves scraping out the old grout with a grout saw and applying new grout. This is more time-consuming but can be done in sections. Allow caulk and grout to cure according to manufacturer instructions. Once grout is dry, apply a grout sealer to protect it from future stains and moisture.
Fixture Upgrades (Sunday Morning): This is where you bring in the sparkle. Replace an old, inefficient showerhead with a new, water-efficient model. Swap out a dated faucet for a sleek, modern one. Don’t forget the small details, like a new toilet handle or even a new toilet seat. These are relatively inexpensive but make a big difference. Ensure you turn off the water supply before working on plumbing fixtures and use plumber’s tape on threaded connections to prevent leaks.
Accessorize & Organize (Sunday Afternoon): Once the functional upgrades are done, focus on aesthetics. Replace old towel racks, toilet paper holders, and cabinet knobs. Add fresh towels, a new shower curtain, and a few small, stylish accessories. Declutter and organize any visible items. A clean, organized, and updated bathroom is a powerful selling feature.
Pro Tip: For an extra touch of luxury in your DIY Home Renovation, consider installing a new, larger mirror or adding stylish wall sconces. Improved lighting can make a small bathroom feel much more spacious and inviting.
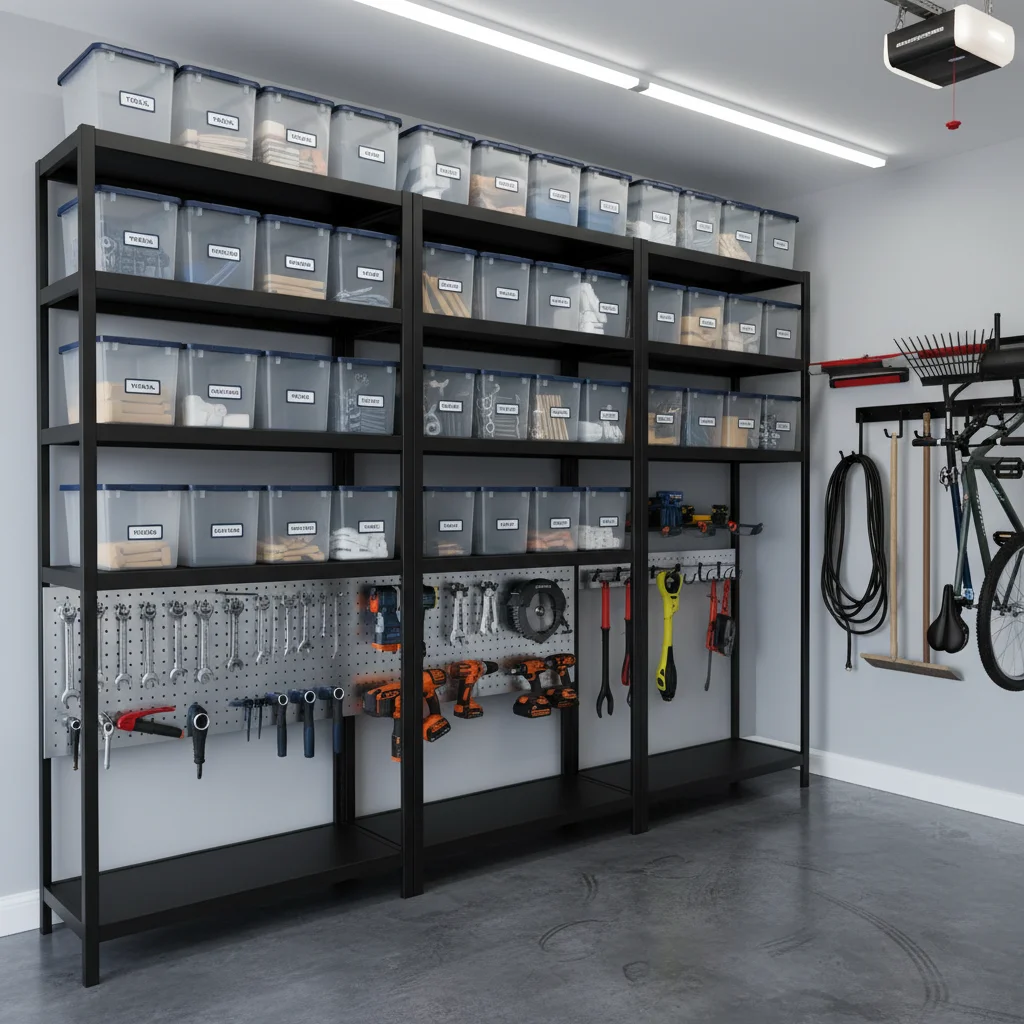
Project 4: Maximizing Curb Appeal and Outdoor Functionality
The exterior of your home is the first thing potential buyers see, making curb appeal incredibly important for property value. This DIY Home Renovation project focuses on making your home’s exterior and immediate surroundings as inviting and functional as possible, often with minimal effort.
Why it Adds Value
A well-maintained exterior suggests a well-maintained interior. Strong curb appeal can significantly influence a buyer’s initial perception and even their willingness to view the inside of your home. Beyond aesthetics, maximizing outdoor functionality, such as creating an inviting entryway or an organized garage, adds tangible value by improving the usability and enjoyment of the property.
What You’ll Need
Pressure washer or stiff brush and cleaning solution
Garden tools (pruners, shovel, rake)
Mulch, flowers, small shrubs
Exterior paint (for front door, shutters, or trim) and brushes
New house numbers, mailbox, or outdoor light fixtures
Storage solutions for garage (shelving, hooks)
Garage floor paint (optional)
Broom, dustpan, trash bags
Weekend Steps for Success
Exterior Clean-Up (Friday Evening): Start with a thorough cleaning. Pressure wash your home’s siding, driveway, walkways, and porch. If you don’t have a pressure washer, a stiff brush and appropriate cleaning solution will work. Clean all windows, inside and out. Sweep and clear any debris from around the house.
Landscaping & Entryway Refresh (Saturday): Trim overgrown hedges and bushes. Weed garden beds and add fresh mulch for a neat, finished look. Plant some colorful flowers or small, attractive shrubs near the entryway to create a welcoming vibe. Consider painting your front door a bold, inviting color, or simply give it a fresh coat of its existing color. Replace outdated house numbers, mailbox, or outdoor light fixtures for an instant modern upgrade. Ensure pathways are clear and well-lit.
Garage Organization & Enhancement (Sunday Morning): The garage is often an overlooked space, but an organized garage adds significant perceived value. Dedicate time to decluttering and organizing. Install shelving units, hooks, and wall organizers to get items off the floor. Sweep and clean the garage floor. For an extra touch, consider applying a garage floor epoxy paint for a clean, durable, and attractive surface.
Final Touches & Maintenance (Sunday Afternoon): Step back and view your home from the street. Are there any last-minute details? Ensure gutters are clean, windows sparkle, and there are no visible cobwebs. Consider adding a new welcome mat and some potted plants near the entrance. These small details collectively create a powerful first impression.
Pro Tip: Ensure your exterior lighting is functional and appealing. Well-placed landscape lighting can highlight architectural features and make your home more inviting after dark, enhancing both curb appeal and security – a key aspect of any effective DIY Home Renovation outdoors.
General Tips for Successful DIY Home Renovation Projects
Embarking on any DIY Home Renovation journey, even for weekend projects, requires a strategic approach to ensure success. Here are some overarching tips to help you achieve professional-looking results and maximize your return on investment:
1. Plan Meticulously
Before you even buy a single item, plan your project in detail. Research thoroughly, watch tutorials, and create a step-by-step checklist. Measure everything accurately, calculate material quantities, and factor in potential contingencies. A well-thought-out plan saves time, money, and frustration in the long run. Don’t underestimate the power of preparation in any DIY Home Renovation.
2. Invest in Quality Tools
While DIY saves on labor, it doesn’t mean skimping on tools. Good quality tools make the job easier, safer, and produce better results. You don’t need a professional-grade workshop, but having reliable basics like a good drill, level, measuring tape, and quality brushes will make a significant difference. Consider renting specialized tools for one-off projects rather than buying them.
3. Don’t Rush the Process
Weekend projects are designed to be completed quickly, but “quickly” doesn’t mean “rushed.” Allow adequate drying times for paint and caulk. Take breaks when needed. Rushing can lead to mistakes that are more time-consuming to fix than if you had simply taken your time initially. Patience is a virtue in DIY Home Renovation.
4. Prioritize Safety
Always wear appropriate safety gear: gloves, safety glasses, and masks when dealing with dust or fumes. Ensure proper ventilation when painting or using strong cleaners. Understand how to safely use all your tools. A safe project is a successful project, and avoiding injury means you can complete your DIY Home Renovation without setbacks.
5. Focus on Cleanliness and Organization
Keep your workspace clean as you go. This not only makes the job site safer but also helps you stay organized and efficient. Clean up spills immediately, dispose of trash, and put tools away when not in use. A tidy environment contributes to a tidy outcome for your DIY Home Renovation.
6. Don’t Be Afraid to Ask for Help or Learn
If you encounter a challenge or are unsure about a step, don’t hesitate to consult online resources, ask a knowledgeable friend, or even visit your local hardware store for advice. There’s a vast community of DIYers eager to share their insights. Continuous learning is part of the DIY Home Renovation experience.
7. Stick to Your Budget
While these are budget-friendly projects, it’s still easy for costs to creep up. Set a clear budget for each project and track your spending. Look for sales on materials and don’t be swayed by unnecessary upgrades. The goal is to maximize value without overspending.
Calculating Your 10% Value Increase
While it’s impossible to give an exact figure without knowing your specific property and market, these four DIY Home Renovation projects, when executed well, collectively target key areas that appraisers and buyers value. Here’s a general breakdown of how they contribute to that potential 10% increase:
Fresh Paint & Trim (Interior): Often cited as having one of the highest ROIs, a fresh, neutral paint job can increase perceived value by 1-3%. It makes spaces feel larger, cleaner, and more updated.
Kitchen Cabinet Refresh: A tired kitchen can drag down your home’s value significantly. A cabinet refresh can offer an ROI of 70-80% or more, potentially adding 2-4% to your overall home value by modernizing the most important room.
Bathroom Grout, Caulk & Fixtures: Clean, modern bathrooms are a must. These updates, though small, can collectively contribute 1-2% to your home’s value by addressing common pain points.
Curb Appeal & Outdoor Functionality: First impressions are everything. Enhanced curb appeal can add 3-5% to your home’s value, or even more in competitive markets. An organized garage also contributes to the overall functionality and perceived space.
When combined, these projects create a holistic improvement that addresses both aesthetics and functionality across your property. The cumulative effect of these well-executed DIY Home Renovation projects can easily push your home’s value up by 10% or more, especially if your home was previously suffering from neglect in these areas.
Conclusion: Your Path to a More Valuable Home
Increasing your home’s value doesn’t require a massive budget or a team of contractors. With the right mindset, a willingness to learn, and a few dedicated weekends, you can achieve significant results through strategic DIY Home Renovation projects. The four projects outlined – painting, cabinet refreshing, bathroom detailing, and enhancing curb appeal – are chosen for their high impact, manageability, and proven ability to deliver excellent returns.
Imagine the satisfaction of stepping back at the end of a weekend, admiring a freshly painted room, a revitalized kitchen, a sparkling bathroom, or an inviting exterior, knowing that your efforts have not only made your home a more enjoyable place to live but have also substantially boosted its market value. This year, make the commitment to invest in your property with these smart DIY Home Renovation projects. You’ll be amazed at the transformation and the financial rewards that follow.
So, gather your tools, plan your attack, and get ready to unlock an additional 10% or more in value for your biggest asset – your home. Happy renovating!
Matheus Neiva has a degree in Communication and a specialization in Digital Marketing. Working as a writer, he dedicates himself to researching and creating informative content, always seeking to convey information clearly and accurately to the public.